ML.NET Image Classification using Model Builder
As we move into the digital era, machine learning applications are becoming increasingly commonplace. From virtual personal assistants to product recommendations and drug discovery, machine learning applications have permeated almost every industry. Due to its increasing popularity, Microsoft introduced an open-source model-based machine learning framework called ML.NET for .NET developers to integrate machine learning functionalities into their applications. Equipped with analytic and predictive capabilities, the framework built on .NET Core and .NET Standard allows it to run cross-platform on Linux, macOS, and Windows operating systems. It supports a wide array of frameworks like the ONNX cross-platform model and Google’s TensorFlow. The framework offers tools and features to help developers easily build, train, and deploy high-quality custom machine learning models locally on their own computers without the need for any prior machine learning experience.
Even though machine learning models have a host of advantages, there are additional tools available through Microsoft to help the developer build and train ML models. ML.NET Model Builder is one such tool that provides a simplified visual interface to build, train, and deploy customized ML models. It is a Visual Studio extension and uses ML.NET command-line interface and ML.NET AutoML to generate the right model based on the developers’ specific requirements. Developers with no ML expertise can use this simple visual interface to train the model and generate code for model training and consumption.
Model Builders can have various types of predictions called scenarios, based on the data that is input to it. Some common scenarios are text classification, image classification, value prediction, and recommendations. Text classifications help categorize data, image classification focuses on identifying images, and value prediction is used to predict numbers and recommendation scenarios to predict suggested items for a particular user.
In this blog, we will focus on how to train and add Image classification to our projects using ML.NET Model Builder and GUI (graphical user interface):
Prerequisites:
To get started, we need to download and install the following:
-
Visual Studio 2019 16.6.0 Preview 2.0 or later
-
.NET Core cross-platform development workload
To use ML.NET Model Builder, we need to first install the Model Builder extension in Visual Studio. It can be downloaded from the Visual Studio Marketplace by using Extension-> Mange Extension from Visual Studio
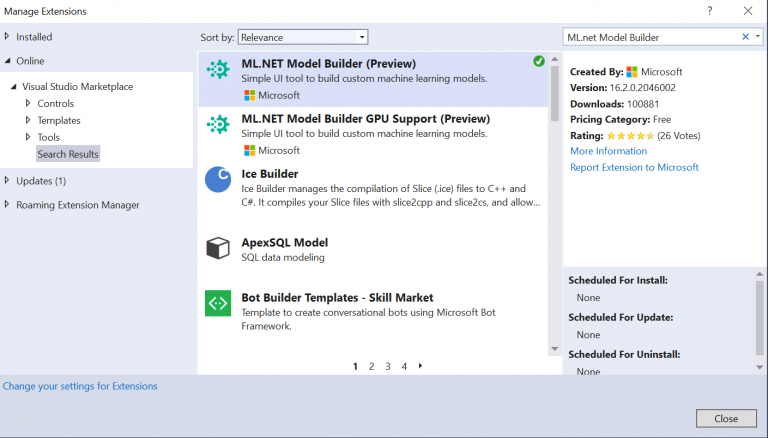
ML.NET Model Builder can also be downloaded directly from the Visual Studio Marketplace
For this section, we are going to use the images TensorFlow flower photos dataset. All images in this archive are licensed under the Creative Commons By-Attribution License, available here and the full license information is provided in the LICENSE.txt file which is included as part of the same image set.
Getting Started
Image classification takes images as input to the ML model and categorizes it into a pre-described class. Adding image classification to the project includes the following processes:
-
Choose a scenario
-
Configure your training environment
-
Load the data
-
Train the model
-
Evaluate the model
-
Add the code to make predictions
Step 1: Choose a scenario
In Solution Explorer, right-click your project and select Add > Machine Learning to launch ML.NET Model Builder.
You will be presented with a screen to choose the scenario screen, select Image Classification, and proceed to the next step.
Step 2: Configure your training environment
For image classification scenarios, you can choose between training locally or in the cloud. For the purpose of this demonstration, we will train the model locally. While local training is great for smaller datasets, the developers will have to work within the constraints of their computer resources like CPU, memory, and disk.
For image classification, you can now take advantage of Azure training to scale up your resources to meet your scenario’s demands, especially for large datasets. You can set up a new Azure Machine Learning workspace and kick off an image classification training experiment right from Model Builder in Visual Studio.
After selecting and setting up the configuration, select the Data button to move to the next step.
Step 3: Load the data
Model Builder expects image data to be JPG or PNG files organized in folders that correspond to the classification categories.To load the data, go to the Data screen, click the button next to the Select a folder option and find the unzipped directory containing the subdirectories with images. Alternatively, we can provide the path to the image folder as a single top-level directory in the text box.
This top-level directory contains one subfolder for each of the categories to predict.
Each subfolder contains the image files belonging to its category and the subfolder name should be the label/category of the image.
The flower dataset which we are using is divided into separate subfolders, one for each flower category:
-
Daisy
-
Dandelion
-
Roses
-
Sunflowers
-
Tulips
Once the data is loaded you can preview the data in the Data preview section.
Step 4: Train the model
In the ML.NET Model Builder train screen, select the Start Training button to start training your model.
We can now start the training process. The time required for training may depend on the limitations of the local machine. The training status can be viewed in the Progress section.
Once the training is complete, and our model is relatively accurate, it is time to test it. Before we move to the next step, we can test the model with some sample images.
Step 5: Evaluate the model
In the Evaluate screen, we can get an overview of the results from the training process, like how long the model took to train and the accuracy. We can evaluate the trained model by providing an image (preferably one that the model did not use as part of training) using Try your model and check whether the trained model is predicting correctly.
Once you’re satisfied with your model, select the Code button to generate the code to make predictions.
Step 6: Add the code to make predictions
In the code screen, select the Add Projects button to add the auto-generated projects to your solution.
Model Builder produces a trained model, along with the code needed to load the model and start making predictions. ML.NET models are stored as a .zip file and the code to load and use your model is added as a new project in your solution. ML.NET Model Builder also adds a sample console app you can run to see your model in action.
It also gives you the code to retrain your model with a new data set, in case you need to retrain it from code, without using the ML.NET Model Builder interface.
The two projects are added to your solution are with the following suffixes:
-
ConsoleApp: A C# .NET Core console application provides starter code to build the prediction pipeline and make predictions.
-
Model: A C# .NET Standard application that contains the data models that define the data schema of input and output model data as well as the following assets:
-
bestModel.onnx: A serialized version of the model in Open Neural Network Exchange (ONNX) format. ONNX is an open-source format for AI models that supports interoperability between frameworks like ML.NET, PyTorch, and TensorFlow.
-
bestModelMap.json: A list of categories used when making predictions to map the model output to a text category.
-
MLModel.zip: A serialized version of the ML.NET prediction pipeline that uses the serialized version of the model bestModel.onnx to make predictions and maps outputs using the bestModelMap.json file.
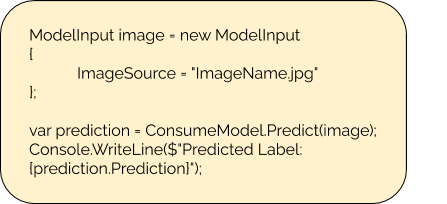
For making predictions using the trained model you can use the following code
Conclusion
In this blog, we learned how to build a customized image classification model with our data successfully. Microsoft has come a long way with this futuristic model of delivering a machine learning model. When coupled with a common programming language, an automated model generated enables developers to use their existing .NET skills to easily train and incorporate image classification into almost any .NET application without requiring any prior knowledge in Machine Learning.
We can help!